A desaturate layer doesn't seem to affect a layer that has a color adjustment

I have edited an image in which to get the result I wanted I applied a color balance tool, on a layer with a mask. I used other layers for manipulation and then, as the final layer, I desaturated the image which SHOULD, I thought, have rendered the image in monochrome.
That is not what happened. Instead the part of the image with the color balance tool applied and masked was rendered in color with the color shift.
Here is a link showing the layer with color balance tool and its mask applied:
https://adam-bridge.smugmug.com/Trouble-shooting-images/Software-Screen-Captures/i-8DtdtF3
Here is a link showing the result of desaturating the image as the final layer:
https://adam-bridge.smugmug.com/Trouble-shooting-images/Software-Screen-Captures/i-p5sm43f
This is totally unexpected behavior. It works identically on my Mac Pro and my M1 Mac mini.
Here is the image with the color balance tool applied to the masked area:
-

Adam
As a test, I:
- created an unfilled layer and drew a mask on part of the image
- made an adjustment to exposure (a quick and dirty test, but I assume that's enough for this exercise)
- created another filled layer and was able to use either the saturation slider or the B&W tool to produce a mini image.
The adjustment on layer 1 remained and the entire image was B&W.
The only question that comes to my mind is did you fill your desaturation layer?
Shane
0 -
To Shane: thanks for testing - you missed the part where the changes were with the Color Balance tool which is the crucial part.
To Michael: thanks for your insight. I’ll write a bug/feature request on this because this makes not sense at all to me. It’s not consistent with how everything else works.
I greatly appreciate the time taken to respond to both of you!
0 -
Gidday Adam (and Michael)
Ah ... yes ... I see what you're saying. <blush>
That IS weird, isn't it?
Regards
Shane
0 -
The effect of layers is cumulative. So if you (a) desaturate the background layer (or a filled layer) by pulling the saturation slider down to -100, and (b) add some saturation to a part of the image on another layer, perhaps bringing the saturation of that part up to +20, the cumulative effect on that part of the image will be -80.
In effect, the colour balance tool affects saturation of some colours (and reduces it on some others).
If you used the B & W tool rather than the saturation slider in older versions of Capture One (before version 20, if I recall) the colour balance tool in conjunction with monochrome would have worked as you expected. But from version 20 (if I'm remembering correctly when it was) it works differently, by design, in that the colour balance is applied after the monochrome is applied. This allows for things like 3-way split toning of monochrome images.
However that change only applies to the colour balance tool. It does not apply to other tools. One way of proceeding, then, is to use the Black & White tool (on the background layer) rather than the saturation slider, to create your monochrome effect. You can then use a layer to affect the colour balance in the b&w as long as you don't use the colour balance tool. You could use the saturation slider, the levels tools on the individual channels, or the curves on the individual channels.
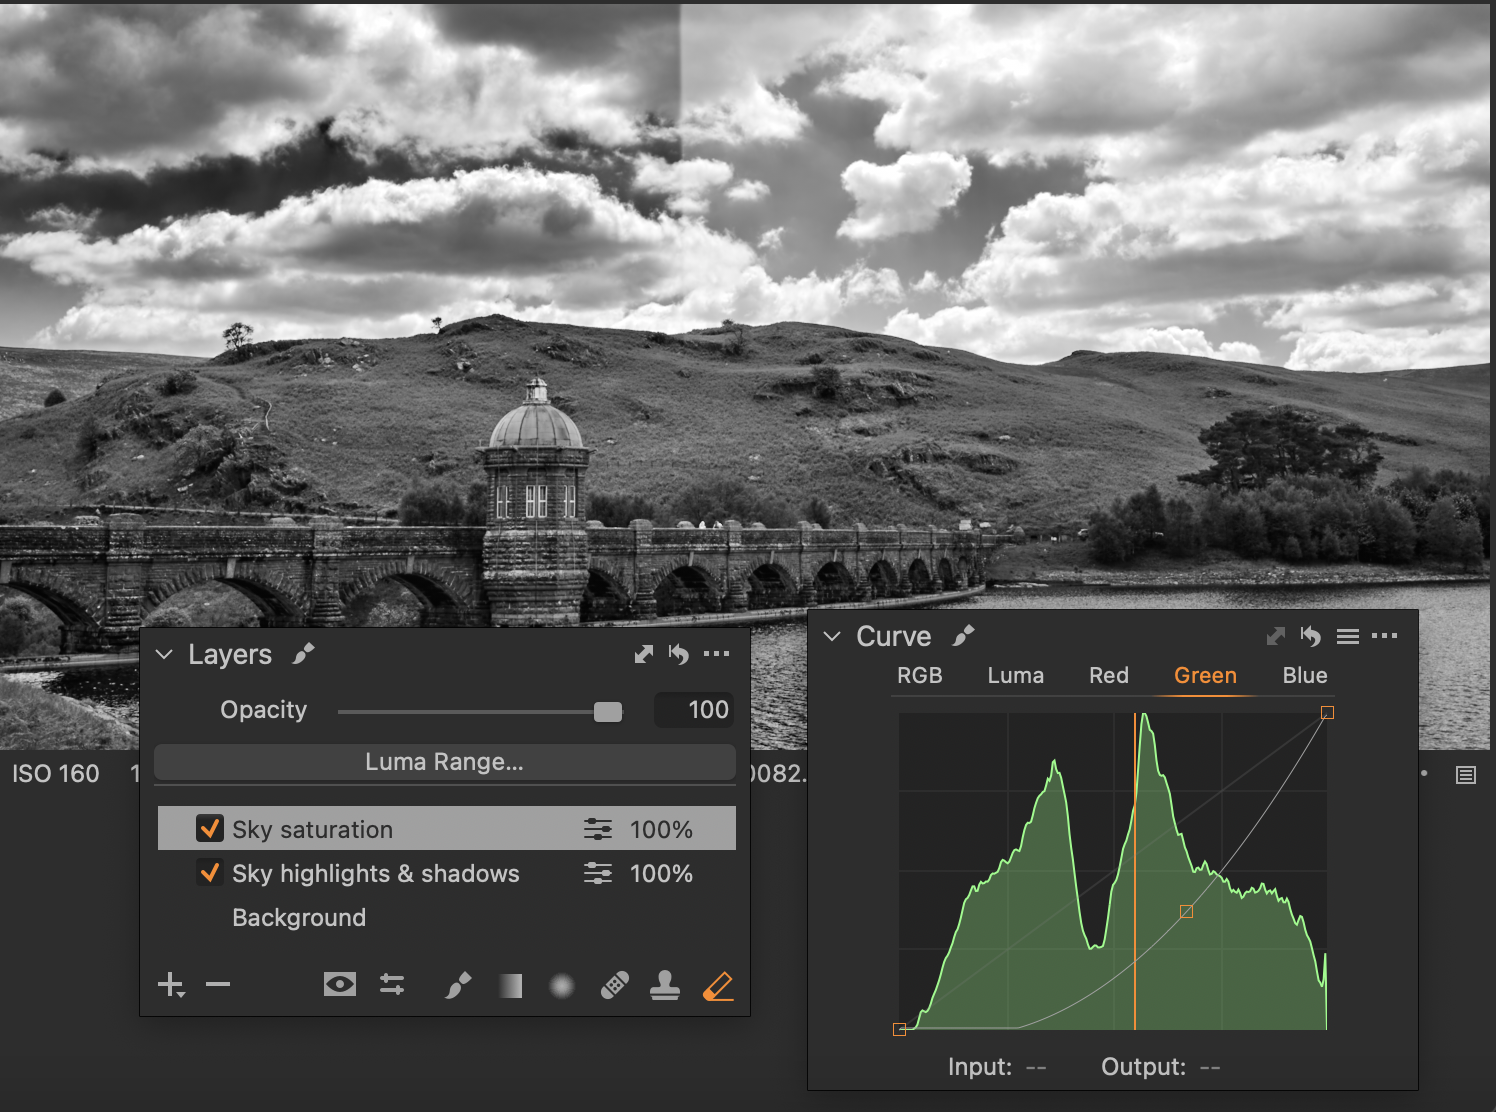
Here's an example. The image is rendered in monochrome using the black and white tool, with some adjustments to the colour sliders in that tool. Then there is a sky layer that accentuates the contrast in the sky using the sliders in the HDR tool. Then I have created a third layer, just to illustrate this, on the left side of the sky only. On that layer I have adjusted the green channel on the curves tool as shown, with a very obvious effect on the sky. (I wouldn't do that really, certainly not to that extent, but it serves to show what can happen.)
So you can adjust the colours of the part of the image you want with tools other than colour balance - some users (not me) prefer in any case to use curves for colour grading rather than the colour balance tool, because that is the way they used to do it in other apps like Photoshop, although PS now has a tool very like the Capture One colour balance tool (in Camera Raw), and apply your B & W effect with the B & W tool not the saturation slider.
Ian
 0
0 -

beside the inconstancies which are rather common for this software I do not understand why you see the need using the color balance tool at all ? i also think the behaviour is logical as you are still working with an color image and c1 is not the only converter which works this way the same is true for adobe.
0 -
Hi CSP and thank you for your response.
I worked with the image in question using multiple techniques in multiple variants. I found that I could not achieve what I wished by first shifting the image to monochrome and then working on it. I'm still new to C1 so it's quite possible I could achieve the desired result working strictly in monochrome.
So I started in the color image, looking to achieve the luminosity I desired before shifting to monochrome (via desaturation of the final layer stack.)
I found that for the particular hillside if I masked it and made some color balance changes I was able to achieve the contrast I desired.
Of course denaturing the image left behind COLOR which was, frankly, shocking. And still is.
I would expect layers to work consistently. In this case, and perhaps others, they do not. If I have a layer, the very top layer, the bit that is logically applied last to the transforms, then all the pixels beneath should be affected uniformly.
I hope this helps you understand my logic, why I chose this path, and why I find it bewildering.
0 -
Ian, thanks for sharing your thoughts and taking the time to make an example. I appreciate your thoughts. I learned something. (always good)
As I explained to CSP I had attempted to get the result I desired starting with the monochrome transition and then working on the resultant image. I wasn't able to achieve the result I desired.
I admit I do not understand the logic behind the Color Balance Tool's implementation.
But I'm grateful for your addition to this community and look forward to finding other comments you may have made to other areas.
0 -
I would expect layers to work consistently. In this case, and perhaps others, they do not. If I have a layer, the very top layer, the bit that is logically applied last to the transforms, then all the pixels beneath should be affected uniformly.
If you are quite new to Capture One, one of the things you need to know is that layers in Capture One are NOT the same thing as layers in Photoshop or similar apps. In Photoshop, as you say you expect the top layer to affect those underneath it. But Capture One layers are not the same thing. It is slightly unfortunate that they have the same name. They are a way of applying local adjustments, really. (Including, of course, local adjustments that apply to the whole image if the whole layer is filled.) Most of the time the order of the layers makes no difference.
Ian
1 -
OMG! Ian I had no idea this was the case and it definitely has changed my understanding of Capture One.
Perhaps I'll need to do a closer read of the documentation.
MUCH THANKS!!!
Adam
0 -
Note Ian's last comment "Most of the time the order of the layers makes no difference." I've run into issues were a heal brush didn't match well until I shuffled the layers around. Don't know if it was a bug or one of the rare times when order does make a difference. I've fallen into the habit of making my heal layer first as I've yet to see an issue doing that. Might be coincidence.
1 -
That's why I said "most of the time"!
Ian
1

Post ist für Kommentare geschlossen.
Kommentare
11 Kommentare