differences between preview and JPEG export
Hello!
I worked with Capture One Pro 7.2 (CO7) for a couple of weeks now to check, if it could be an alternative to Lightroom 5.3.
CO7 has some big advantages in processing details and "crisp" images out of the box. But when it comes to JPEG export, pictures quality drops significantly.
The most serious thing is, that the color is not the same between the preview in the editor and the exported image.
I tried to put everything on one picture to show an example: http://christianstork.de/upload/CO7_processing_diff.jpg
The left one is the JPG, reimported. The right one ist the RAW. The lowermost histogram is the one from the RAW. You see difference here already!
And I copied the export settings into this picture, too (lower left).
The difference can be seen easily in the skin tones and the details in the hair. Altough this JPEG with 100% output quality setting is nearly as big as the RAW (13 MB vs. 12 MB), the pictures quality is disappointing to me. The loss of small details would be ok for me, but there is also a big difference in color and gradiation. Why?
Another setting for ICC profile does NOT change the output!
With Lightroom, the preview in the editor shows exact the same color settings and gradiation as the later JPEG output. For now, I must say, Lightroom does a better JPEG output. Currently it is more or less a kind of guess what the look of the CO7 output will be. 😡
Did I something wrong, or what is the reason for this difference between preview and output?
0
-

Can you make the raw-file available ? 0 -

Because of the persons in the picture I don't want to post this picture.
But I have another one:
Editor view: http://christianstork.de/upload/02_CO7_Editor.jpg (look at the sand)
RAW: http://christianstork.de/upload/S9210161.ORF
JPEG: http://christianstork.de/upload/S921016 ... beitet.jpg
The upper histogram is the one from the RAW. You can see that there is a different white balance displayed.
The RAW was NOT edited. Just loaded and exported as JPEG. I tried it with many different pictures, and unfortunately the issue comes with ALL of them!
In addition to this, there is also a significant loss of sharpness, although I took the 100% quality for output (between 85% and 100% there is not a big jump, by the way)0 -
Does anyone have a solution?
Or does the picture on your computer appear always the same between preview and export?
I can't make propper adaptions on color setting when the software doesn't show me a propper preview. I always have to "guess" what the picture will look like. And I didn't find a kind of editor preview settings.0 -

Your comparing a RAW file to a Processed and Compressed JPEG file.
Yes, there will be a slight difference as JPEG compression drops data to save space.
Compare a Tiff to the RAW for consistency.
Going forward please simply understand that a JPEG is not as good as a TIFF and that is not as good as a RAW. If it were, shooting RAW would be fairly irrelevant.0 -
Hello Drew,
thanks for your reply.
Maybe you did not get the intention behind my question. I do not want to compare the JPEG output with the RAW file. I’m comparing the PREVIEW in the editor with the JPEG result.
In most cases I produce JPEG files for presenting in the web or presentations for friends and family. I do underwater photography, therefore I often want to correct several things in the picture before exporting them as JPEGs. But when I do adaptions like white balance, color shift, saturation, etc., I want to have this changes shown in the preview (editor). What is a preview wise for, when it does not show what comes out.
Maybe I can explain it with an exaggerated example:
Assume you have a RAW which is shown “white†in the editor, I want to have it more green and so I change the color settings until the picture in the viewer has the color I want to have. But after the JPEG export it is not that green which I tuned in the editor. It is darker or less brilliant or what ever. Capture One always presents me a different “picture†as it is later seen in the JPEG! So minutes of work for noting.
The thing is, that other RAW-Converters, like Lightroom or the Olympus program Olympus Viewer show me a preview which has exactly the same apperance as the later JPEG is, at least refered to color. These programs work as a “what you see is what you getâ€-editor. Unfortunately not so in Capture One, as you can see in my screenhots.
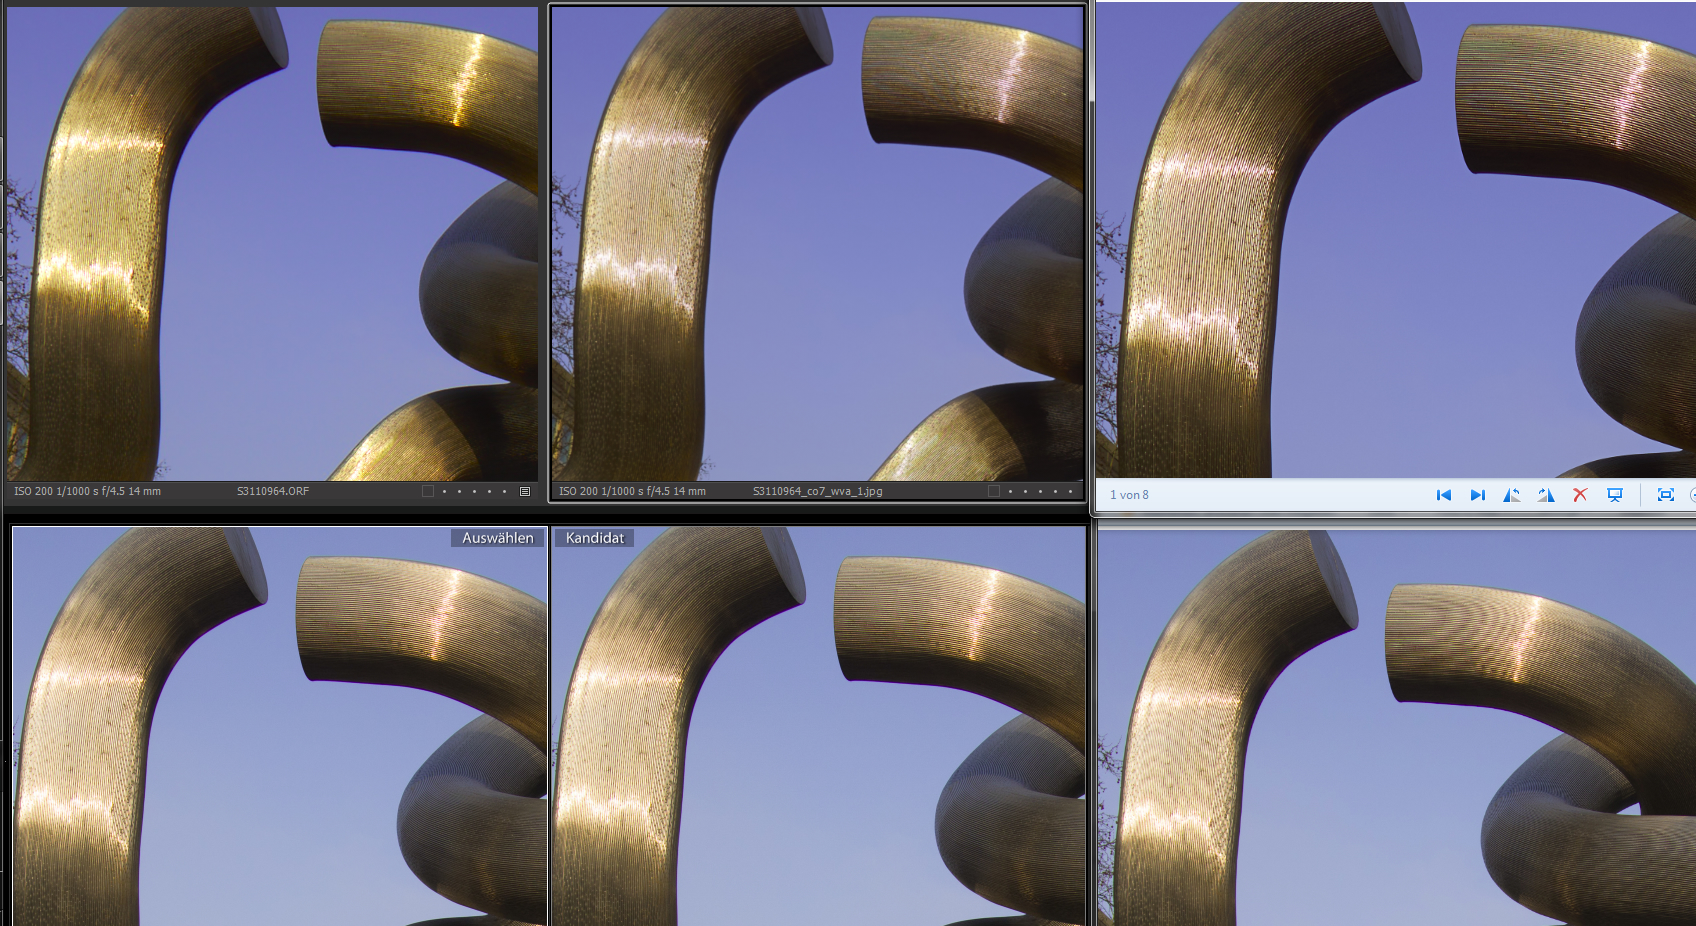
I tried to combine the issue on one screenhot (it's the same RAW-File):
http://christianstork.de/upload/EditorVsJpegOutput.jpg
1 2 3
4 5 6
1: Capture One Pro 7 Viewer: RAW
2: Capture One Pro 7 Viewer: JPEG from 1 (re-imported)
3: MS Windows Explorer: JPEG from 1
4: Lightroom: RAW
5: Lightroom: JPEG from 4 (re-imported)
6: MS Windows Explorer: JPEG from 4
Number 1 (the RAW file) looks in Capture One quite "poppy", with a kind of "golden" effect. The JPEG out of this RAW file (number 2 and 3), looks more flat, with less intensive brilliance. There definitely is a difference between the apperance of the RAW and the JPEG.
Number 4 is the same RAW file in Lightroom. You can see easily that there is nearly no difference between the look of the RAW (4) and the JPEG (5,6).
Also the JPEG viewed with the Windows Explorer has the same apperance as the re-imported JPEG in Capture One (or Lightroom).
=> So the issue is the difference shown between pictures 1 and 2.
Maybe Capture One makes a “better†or “more accurate†or “deeper†interpretation, but I only want, that the software shows me a proper preview of the result which will come out after the conversion. How can you work on the picture when the software doesn't give you a proper preview?
I also found the viewer setting “Proof Profile†where I can select several color spaces. But this has absolutely no effect on the preview in the editor.
Or did I something wrong? Is there anything to set or select, to get a preview "sRGB"?0 -
[quote="NN635262549582868119UL" wrote:
But after the JPEG export it is not that green which I tuned in the editor. It is darker or less brilliant or what ever.
...
These programs work as a “what you see is what you getâ€-editor. Unfortunately not so in Capture One, as you can see in my screenhots.
No, I understand what you are saying and Capture One is absolutely a WYSIWYG application.
Keep in mind however, that in the Viewer you are seeing the RAW file at 1:1 at 100%. Once you process to a JPEG you are processing to a smaller file with less resolution and compression, hence the difference.
As previously noted, process a TIFF and compare to Capture One at 100%. The results will be identical.
JPEG compression however, is not accounted for in the Preview of Capture One.0 -

[quote="NN635262549582868119UL" wrote:
I also found the viewer setting “Proof Profile†where I can select several color spaces. But this has absolutely no effect on the preview in the editor.
Or did I something wrong? Is there anything to set or select, to get a preview "sRGB"?
Hi,
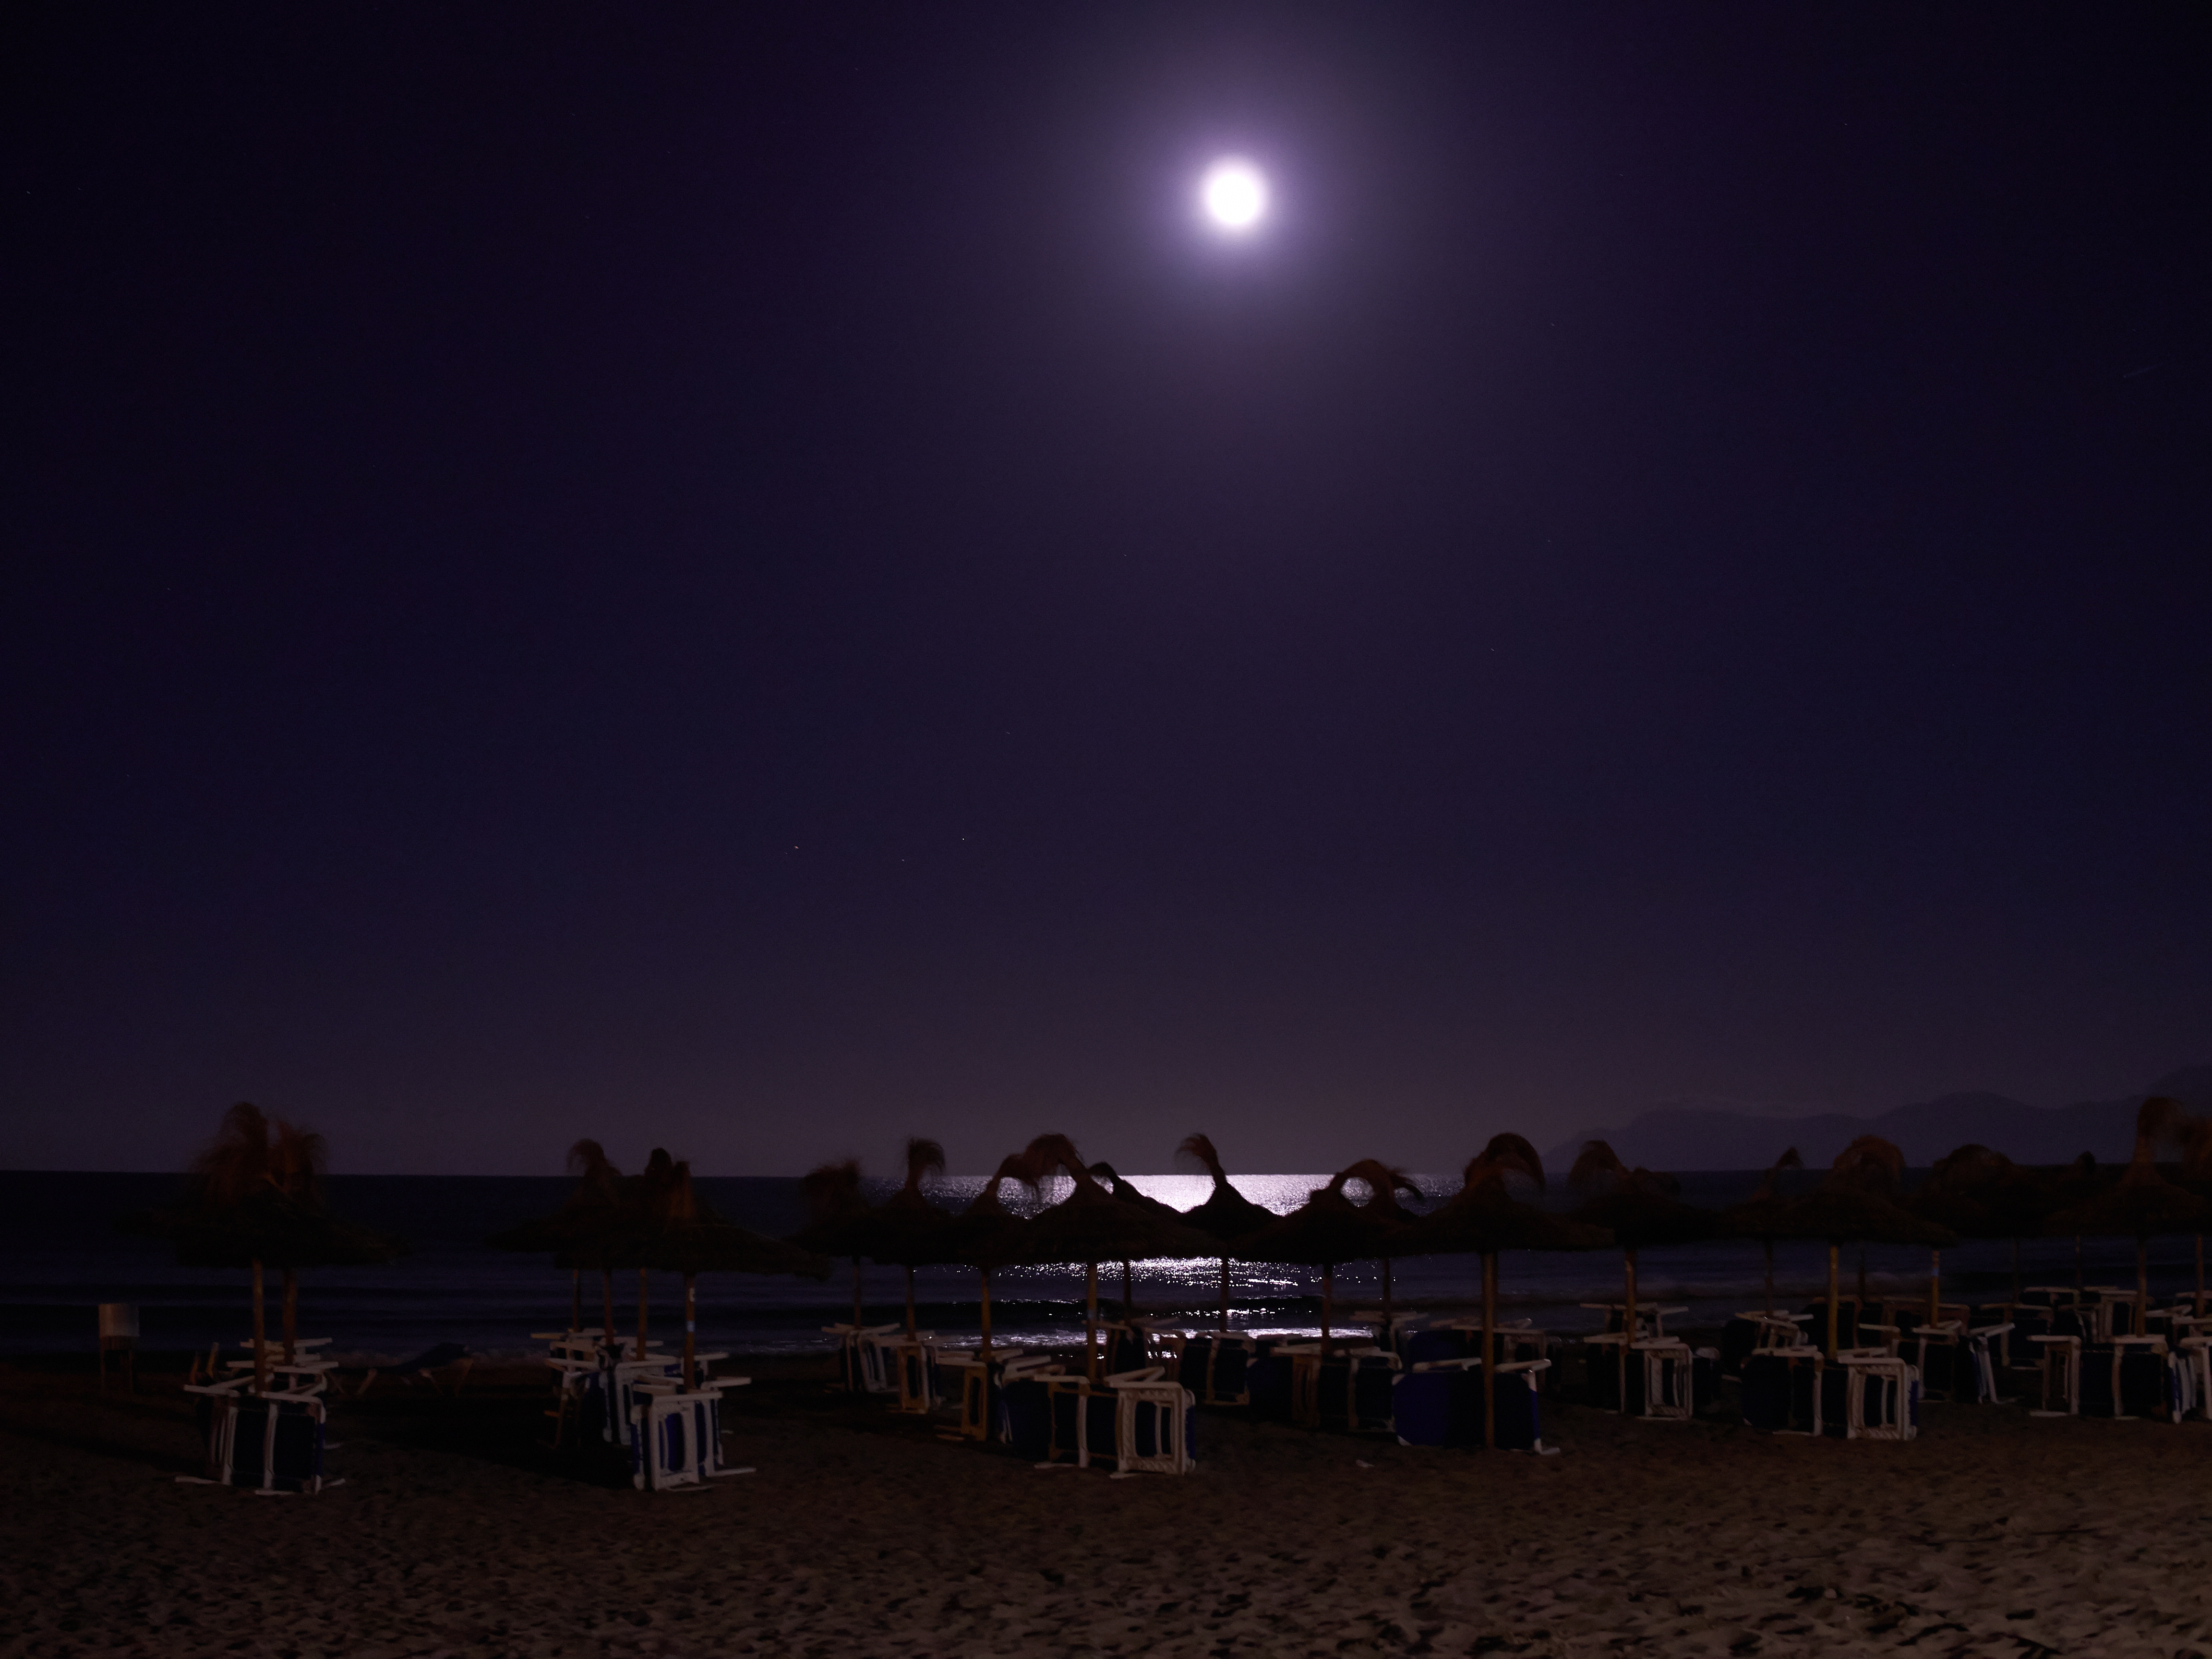
I looked at your beach night scene files through C1 and some other viewing applications.
In C1 I can process your RAW file to a jpg (no edits - I don't know if you made any) and the resulting jpg (at 750 pixels and 80% quality) is closer to the on screen preview of the ORF file (when reviewed side by side in C1) than your example. The main difference is in the dark areas, especially the sand under the tables, which appears a little lighter in your original jpg. Maybe .1 or .2 of a stop. Something similar happens in my output jpgs as viewed on screen but not quite as much and in any case I produced smaller versions.
Also the histograms are not so different between the images I see on my machine but they are different to the histograms in your sample screen captures.
I have no idea why that should be.
Using my system the Proof Profile can make a difference to the Preview of the ORF but some do not make enough difference to be discernable.
What settings do you have in the Process recipe?
It might be interesting to pack the original and your edits as an EIP file and see what results are obtained on a few systems in order to ascertain how much 'natural' variation can be found 'in the field'.
Grant0 -
With all due respect to the originator of this thread I think you are nit-picking. Also, if all your outputs are jpegs then I wonder if Cap1 is really necessary for you?
My experience in comparing images on screen is that slight colour casts can be misleading. The best test (for me) is to print the images in a third party environment such as QImage.
If you feel strongly enough about your colour problem you should submit a Support Case, referring back to this thread.
Good luck!
Peter0 -
[quote="SFA" wrote:
In C1 I can process your RAW file to a jpg (no edits - I don't know if you made any) and the resulting jpg (at 750 pixels and 80% quality) is closer to the on screen preview of the ORF file (when reviewed side by side in C1) than your example. The main difference is in the dark areas, especially the sand under the tables, which appears a little lighter in your original jpg. Maybe .1 or .2 of a stop. Something similar happens in my output jpgs as viewed on screen but not quite as much and in any case I produced smaller versions.
Using my system the Proof Profile can make a difference to the Preview of the ORF but some do not make enough difference to be discernable.
I'm on the way to isolate this issue!
I noticed, that the "color shift" is more noticeable and even worse in pictures with high ISO settings.
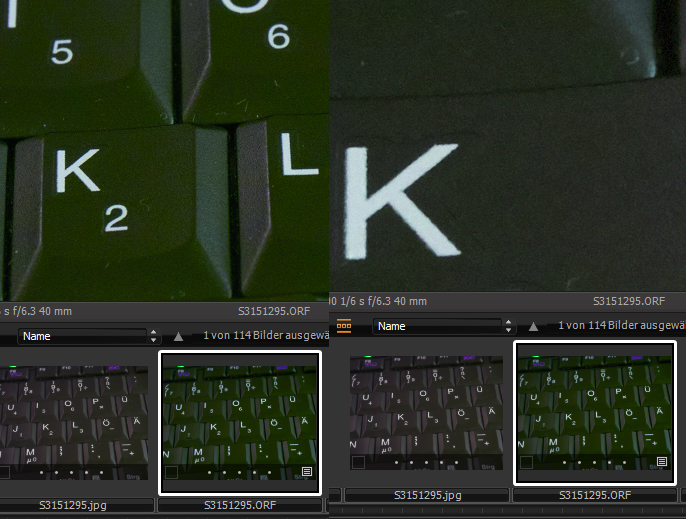
So I took a picture with high ISO and this leads to an extreme example:
http://christianstork.de/upload/c1_color_issue_01.jpg
The right pictures in the navigation bar is the RAW, the left one is the JPEG. I changed the white balance of the picture so that it looked like the JPEG now seen in the navigation bar. After exporting to JPEG and importing it again, curiously the RAW "fell back" to it's former color set. So now both pictures look completely different AND there is a difference between the preview in navigation bar and in the editor! As you can see I selected the RAW but the preview shows something different. More funny when zooming in:
http://christianstork.de/upload/c1_color_issue_02.jpg (seems to be a bug?)
Zoom in brings the color it should have. This is what I tuned before and exported as JPEG. Zoomed out is shown something different.
(I would start a support case, but this seems only to be possible with a valid serial number. And I'm still using "only" the trial version)
This is the most extreme example I could reproduce. But what I see more often is just a slight difference in color between the RAW in the editor and the later TIFF or JPEG, as I tried to show with my last post.[quote="Drew" wrote:
[quote="NN635262549582868119UL" wrote:
But after the JPEG export it is not that green which I tuned in the editor. It is darker or less brilliant or what ever.
...
These programs work as a “what you see is what you getâ€-editor. Unfortunately not so in Capture One, as you can see in my screenhots.
No, I understand what you are saying and Capture One is absolutely a WYSIWYG application.
Keep in mind however, that in the Viewer you are seeing the RAW file at 1:1 at 100%. Once you process to a JPEG you are processing to a smaller file with less resolution and compression, hence the difference.
As previously noted, process a TIFF and compare to Capture One at 100%. The results will be identical.
JPEG compression however, is not accounted for in the Preview of Capture One.
I also tried the workflow RAW => TIFF => JPEG. The TIFF looks equal to the JPEG. But the TIFF itself looks different to the RAW. It stays the same and makes the workflow much more complicated.
Not so in Lightroom. There the RAW, TIFF and JPEG look all the same regarding the color. So what are the other programs then? "WYSI really WYG"?
I can't believe that one of the most expensive and "the world’s best" RAW converter is not able to give me a proper color preview before having to export every picture to a 100 MB big file.[quote="Peter" wrote:
With all due respect to the originator of this thread I think you are nit-picking. Also, if all your outputs are jpegs then I wonder if Cap1 is really necessary for you?
My experience in comparing images on screen is that slight colour casts can be misleading. The best test (for me) is to print the images in a third party environment such as QImage.
Hi Peter,
Comparing printed images ist not helpful in my case. As I wrote, in most cases I want to export the images as JPEGs for presenting them on screens or for my digital album. So the JPEG quality is the only thing that matters to me now.
And what is "necessary"? I want to have a better image output as Lightroom can give. C1 gives me better results, but unfortunately not in any cases and with relatively many limitations, regarding the price.0 -
Christian,
Using your ORF file I also saw that the Browser preview does not update with the edits made even when the Main viewing window has changed. I could not make it change either for some reason. I have not seen this with my Canon files so it may be something specific to Olympus/ your camera model that has not been reported previously. I can't be sure.
If I process the Edit to a jpg (even restricted to 750px and at 80% quality and then compare the ORF + edits and the jpg side by side in the Viewing window the results are very close.
If you add some colour readout 'pins' to one of the images C1 should add a pin in the same place to both selected images so that you can compare RGB values. You might expect some variation due to jpg compression but most values should be close point to point.
On my system, and remembering that I am comparing at reduced size for the edit ORF with a 750px compressed jpg, most points showed values within 1 or 2 for each colour at each point. Sometimes all the values were reduced by 1 or 2 but all equally for that point. That's probably about as accurate as we can expect for this approximate comparison.
However when I look at the darkest areas - basically somewhere in the range of 1 to 50 - the differences become less consistent. I think this can be expected because the potential for fine tuning colours in a compressed file in dark areas are restricted by the much reduced level of data to provide details.
By the way you don't need a serial number to register a support request as far as I know. The case logging system asks for one but it is not a requirement to supply a valid number (I believe). See the link.
viewtopic.php?f=46&t=15259&p=71209&hilit=trial+support+case&sid=718e524d9b879440c60dd822c10a7e96#p71209
Finally, I tried a white balance using the WB picker on the legs of white seats in the beach image and found that that change made a huge difference to the image and seemed to bring the colour matching somewhat closer. The original looks like it has a magenta cast (to mu eyes at least) and things that help to create you observed problem look better with that removed - or so it seems to me. See if you get the same results for the reduce colour discrepancy.
HTH.
Grant0 -

Hi,
Nikon D700, Nikkor 24-70mm F2.8, C1 7.2, NEF 14b, TIF 8b, JPG 8b look different at magnifications other than 100%!!!! on a calibrated monitor. Images are taken and displayed in sRGB space. At 100% magnification ALL three look the same. It may take a serious amount of search to detect minute differences. BUT, if I have to make a significant effort to find then, they are irrelevant to PHOTOGRAPHY. For testing the equipment, maybe relevant, but equipment is not relevant for PHOTOGRAPHY, except for a very few special situations. I know many will disagree, but I know that a "technically good photograph" is not necessarily PHOTOGRAPHY.
The higher the ISO the more complicated it is to make a decent JPG due to problematic noise compression. This is a thorny issue and my 2c worth advice is to turn off ALL noise reductions to make a good comparison.
F.0 -
[quote="pkurhieuyr" wrote:
Hi,
Nikon D700, Nikkor 24-70mm F2.8, C1 7.2, NEF 14b, TIF 8b, JPG 8b look different at magnifications other than 100%!!!! on a calibrated monitor. Images are taken and displayed in sRGB space. At 100% magnification ALL three look the same.
This is not unique to Capture One. Any image viewing software cannot match 3 different files, with 3 different compressions and 3 different resolutions perfectly. Even the same image in Photoshop will look slightly different at "Fit", 33% Zoom, 50% zoom and 100% zoom. All software's do their best but as anything other than 100% is an interpretation of the file, differences will exist if ever so slight.0 -
Drew,
I think I did not explain myself. I did not mean that C1 is flawed. So, you are right, it is a general property of compressed data reconstruction.
I should have stated that any test at other than 100% magnification is flawed, i.e., not really a test,
F.0 -

I have this exact problem with high ISO images. It's really unfortunate to read that you experienced this with Capture One Pro 7 because I am using version 8 and it is still not fixed. I love using capture one pro's tools but I don't really see the point in using them if it just spits out an image not the way it is meant to be. I have trialled DXO optics and I own the Cloud version of lightroom 5 and they both export flawlessly. Looks like I will have to stick to those + PS ☹️ 0 -

[quote="FirstName" wrote:
I have this exact problem with high ISO images. It's really unfortunate to read that you experienced this with Capture One Pro 7 because I am using version 8 and it is still not fixed.
This thread is a year old and ended in the conclusion it is not a Capture One issue. Now you have the same problem. What is your problem? What need to be fixed? You did not provide details but you draw a conclusion anyway. I do not question you being sincere but suggest to open a new thread in the proper CO8 forum for clarity of arguments and hopefully solutions.0 -

Have same issues with noisy IR image, actually wrote although a topic on it.
and that in any file format.
check on your color profile, it although might cause some color shifting afterwards. adobe RGB1998 as universal, sRGB for internet.0 -

Same problem here.
C1Pro 8.3.0.52
Nikon Nef d7100 loaded high iso.
100% zoom color change.
Examples open Nef and zoom 50%, then open focus tool and set this tool zoom ratio to 100%, color is different.
Same color switch if you zoom 100% and trying change some basic color hue.
All high iso same problem. Exported Tiff is so different,I can not use this software now. Switched Lightroom.
It is bug. Can not accurate edit anything now.
I can send by some files if support need that.0 -
Hi there, I have the same problem and I can assure the sceptics that it's not nit picking, it's night-and-day discrepancies. I'm using Canon 6D and C1 Pro 8, retina macbook pro . The deadly combo is to use high ISO and play with the C1 exposure/contrast/HDR settings - I get a lovely desirable green tint in the ''fit to screen'' preview, then zoom in one notch and it re-renders totally differently, greens go brown, and this is what I get in the final TIFF or JPG output. I think it's an issue with the fit-to-screen preview rather than the processed image, because the fit-to-screen is a (beautiful but) unexpected sense of colour. I thought it may have been related to colour or luminance noise reduction but no. Shame that this is a long-standing issue now. 0 -
Hang on, I've moved a session from my MacBook Pro (retina 13 inch early 2015) to my 27 inch iMac (late 2013, not retina), and the issues I'd had with a couple of specific images in that session don't seem to have the problem any more. These are early days regarding isolating the issue for me but maybe it's something to do with screen compatibility, or screen resolution?? 0 -

I've just logged in to contribute to this thread.
I was getting massively frustrated the other night with exactly this problem on an 800iso X100s file - the exported JPEG being obviously very differently saturated from the preview in Capture One. I ended up trying to approximate what I wanted by a trial-and-error process of adjusting, exporting, viewing and refining (I was using both Google Chrome and Windows Photos to view the output.) Very vexing when I've paid a lot for this software.
So.
I decided to log in to add my voice to this thread so that Phase might be moved to address this glaring bug. I loaded up that very file, in the adjustment state I'd left it in, with the intention of saving a screenshot of COP to show here alongside the resultant JPEG. But today, when I exported the JPEG, is was EXACTLY THE SAME AS THE PREVIEW. That is to say, COP is behaving correctly - differently to the way it was the other night.
Other bugs include the one where you go to "undo" your most recent action, only to find that COP has not recorded ANY undo states in its history - while at other times there will be undo states for as far as could wish.
The one where you alt-click on the "Reset adjustments" icon to momentarily compare your adjustment with the default, and COP arbitrarily chooses not to acknowledge the Alt command and you lose all your adjustments within that section.
So yes. Here I am. The problem that this thread refers to is real, but apparently only when COP feels like misbehaving.
- Ed
EDIT: I just noticed this thread is in the Mac section - I'm a PC user, and I'm using COP 8.3.3 but it doesn't seem worth starting another thread.0 -

Dear All,
I recently spent the last few hours getting to the bottom of this problem. I saw exactly this problem, strong color shifts going to higher magnifications and also strong color shift in the final output across numerous viewing software and color modes and ICC profiles. What ended up solving the problem for me was to go into the details tab and set the color noise reduction to 0%. At that point the colors matched at all levels. Naturally this removes color noise reduction for the majority of images. However, at 100% view the loss of saturation effects due to noise reduction are visible.
Test out turning off color NR and see if it fixes the problem.0 -

Hi all,
Please see a continuation of this issue in the latest CO10 version (or at least an issue that seems closely related to this one):
.
By the way, I tried this but to no avail:[quote="NNN634637312486142881" wrote:
... What ended up solving the problem for me was to go into the details tab and set the color noise reduction to 0%. ...
Cheers.0 -

The reason I like to shoot in RAW+JPEG is that the JPEG https://www.cleverfiles.com/howto/what-is-jpg.html preserves your chosen film simulation. It's fixed into the image, whereas if you upload a RAW file to most processing software like Lightroom, your film simulation will be trashed and the Adobe Standard color profile will be assigned to your image. You can sort of get it back in the Camera Calibration tab in LR and PS, but it's not exactly the same colors as the original Fuji colors.
If you tend to process most of your photos anyway, maybe this isn't a big deal. For me, I love how the Fuji Jpegs look, and I'm often making a deliberate choice about what film sim I'm using, so I definitely want to preserve that. In that way, the RAW is sort of your backup file, and if you need to adjust, you have the flexibility, but if you want to quickly share the image, or if you find that the JPEG looks fine, then you have a ready file with your film sim still embedded.
Of course, you can always process and select a film sim using the camera's built-in RAW processor, but you can only do this while the card is in the camera.0
投稿コメントは受け付けていません。
コメント
23件のコメント