Automask with Capture One 12.1.3

I’ve been using Lr since v.1 Beta, but I’ve been slowly learning C1 as well. It has a lot of great features, and I prefer it for my A7R III files. One thing I have a challenge with, however is that the Automask feature for masking seems pretty much completely useless.
This is the Brush setting in C1 12
[url]https://www.wolfnowl.com/wp-content/uploads/2019/09/AM1.jpg[/url]
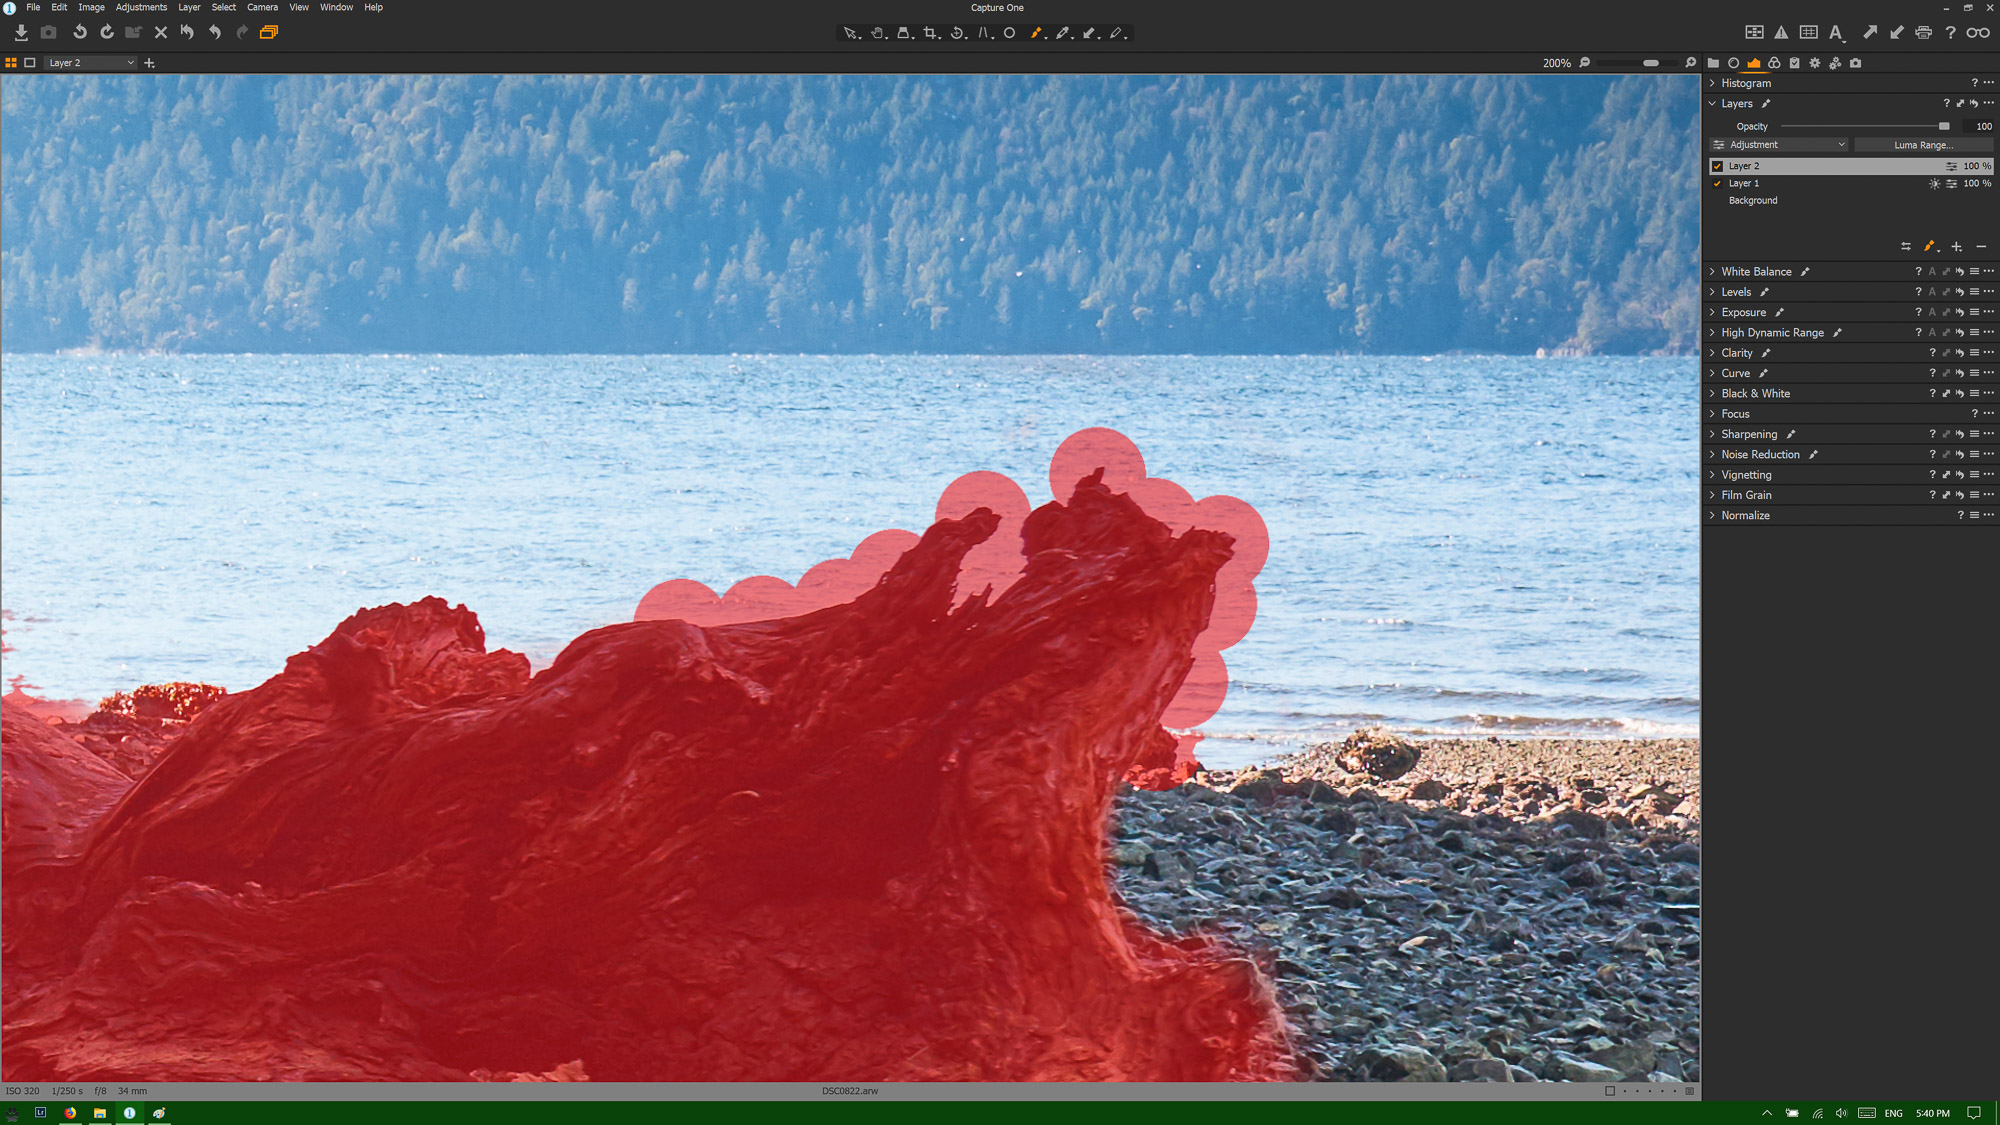
I masked in most of the driftwood okay but didn't get too close to the edges. With Automask turned on, I get this:
[url]https://www.wolfnowl.com/wp-content/uploads/2019/09/AM2.jpg[/url]
By comparison, here's the result from Automask in Lr:
[url]https://www.wolfnowl.com/wp-content/uploads/2019/09/AM3.jpg[/url]
Is it just me or is anyone else running into this?
Mike.
This is the Brush setting in C1 12
[url]https://www.wolfnowl.com/wp-content/uploads/2019/09/AM1.jpg[/url]
I masked in most of the driftwood okay but didn't get too close to the edges. With Automask turned on, I get this:
[url]https://www.wolfnowl.com/wp-content/uploads/2019/09/AM2.jpg[/url]
By comparison, here's the result from Automask in Lr:
[url]https://www.wolfnowl.com/wp-content/uploads/2019/09/AM3.jpg[/url]
Is it just me or is anyone else running into this?
Mike.
0
-

[quote="wolfnowl" wrote:
...I masked in most of the driftwood okay but didn't get too close to the edges. With Automask turned on, I get this:
Exactly what I get myself when I'm too sloppy 😕
Automask will bleed if there is not enough contrast to neighbouring elements. Judging from your images, that goes for LR as well.
I would suggest you use a small brush and hardness less than 100% so you can pay better attention to the third outer circle. Enlarge the image so you can work the fine edge details on the driftwood. Work along the edges to make a closed circumference (show mask while you do this). Erase occasional bleeds and then Select Fill Mask in the Layer drop down menu.0 -

The round blobs look strange.
Did you get the edge positioning right for that section?
Have you tried the "Refine Mask"option to see what might happen?0 -
Thank you both for your replies, but I'm afraid you both missed the point I was trying to make. Let me be more specific...
First, this is an image I trashed, but I chose it here because it demonstrates so well the point I was trying to make. This is a 42 MP file, zoomed in to 200%.
Now the brush tool is supposed to have a central area that reads the pixels over which the circle is hovering and a larger circle over which it applies the mask. Depending on hardness, there is also a bleed area for feathering. With automask turned off, [b]everything [/b]in the larger circle will be covered by the mask. Automask is [b]supposed [/b]to read the pixels in the central circle and only mask areas within the larger circle that match that tone. It does this based on contrast, primarily, although hue plays a part as well.
The reason I used this piece of driftwood as an example is that it's almost black and surrounded by water that's almost white. One doesn't get much higher contrast than that.
With automask enabled, I carefully put the centre of the circle over areas of the driftwood that were quite dark. What I expected was that the brush would mask to the edge of the driftwood and ignore the much brighter areas of water surrounding it. What I got instead was a series of blobs where the mask acted [b]as if[/b] automask was not enabled at all and it simply masked everything within range of the brush. The Lr sample shows the way automask is [b]supposed [/b]to work, by selecting the darker areas and ignoring the lighter ones. There are small edges where Lr didn't select the driftwood, but there's some purple fringing there and hence a different hue. In other words, Lr was working exactly as it was supposed to work.
So, I revert to my original question. I've not been satisfied with the automask feature in C1 12.x and wondering if anyone else is encountering the same thing.
Mike.0 -
Mike,
The answer is that - no, I have not seen anything like your example and I did try, like you, an image that is more or less trash being a panning shot that just missed good focus and so has a dark subject, with highlights and a lighter surrounding area (but in my case with a slightly weak contrast due to the 'soft' focus resulting from the OOF panning). The quickly drawn mask readily overlaps subject and background but can easily be refined to cover just the area of the subject.
The "blobby" area is particularly strange and I'm not sure what to try to attempt to create something similar. It's almost like it has been created with "spots" of mask at 100% opacity at some point completely separate from the main masking activity.
Is that what happened? You added some revisions to the original mask and the Auto mask did not find the separating "edge" as expected?
If so are you able to repeat the activity on another variant of the image and obtain the same result?
Grant0 -
Hi Grant: Yes, I traced most of the mask in the first picture (the one showing the brush settings). I then set my mouse near the edge of the driftwood and clicked, expecting the mask to select the dark area of the driftwood and ignore the water, but as you can see, it didn't. Each 'blob' is one mouse click on a dark area where the brush masked everything within the circle. I did basically the same thing in Lr and it generated the response shown in the third image. I zoomed in to 200% because I've found in Lr that Automask works better/more accurately when zoomed in.
Having said that, I was thinking afterward that in Lr we have edge masking, and that's pretty much it. In Capture One we have edge masking, Luma Range masking AND Colour Editor masking, so while it's perhaps normal to try to use what you know from an old system on a new one, it's often not the best use of the new software's capabilities.
Mike.0 -
Mike, you can get that effect of you click the brush at the boundary line using the centre area.
That overrides the Auto Mask setting.
The boundary line to be used as the edge needs to be between the outer circle and the inner circle not within the inner circle. (The main circles you see with Hardness set at 100%. If you use less than 100% hardness you will see and addition external circle with a thinner line - that will also work along the same lines providing the inner circle and a the outer area(s) have something different enough to work with.
Could that have some bearing on what you have experienced?
Grant0 -
That could be. Thanks for letting me know!
Mike.0 -
I don't use auto mask much, but when I do, I find that the most convenient setting to be able to position the brush right, as Grant describes, is a hardish brush, but not very hard.
Ian0 -

[quote="wolfnowl" wrote:
That could be. Thanks for letting me know!
Mike.
As a LR user since V1 I know how easy it is to initially inadvertently limit oneself to just using the tools that were in LR.
In C1Pro you do have alternatives such as using the Advanced Colour editor to select a range of colours and either alter the image directly or create a mask from the colour selection, with or without a rough "mask" to control where the effect occurs.
You also have controls like "Refine mask", "fill mask", "luminosity mask" and "invert mask" which can be used after the initial mask drawing.
Ian0

![https://www.wolfnowl.com/wp-content/uploads/2019/09/AM1.jpg[/url]](https://www.wolfnowl.com/wp-content/uploads/2019/09/AM1.jpg[/url])
![https://www.wolfnowl.com/wp-content/uploads/2019/09/AM2.jpg[/url]](https://www.wolfnowl.com/wp-content/uploads/2019/09/AM2.jpg[/url])
![https://www.wolfnowl.com/wp-content/uploads/2019/09/AM3.jpg[/url]](https://www.wolfnowl.com/wp-content/uploads/2019/09/AM3.jpg[/url])
Post is closed for comments.
Comments
9 comments