QUESTION
How do I remove the red-eye effect in Capture One?
ANSWER
If there is some red-eye effect on your images you want to get rid of, use Capture One for that purpose.
One of the possible solutions to remove the red-eye effect is to follow the steps below:
1. Select an image in the Browser.
2. Create a new empty Adjustment Layer.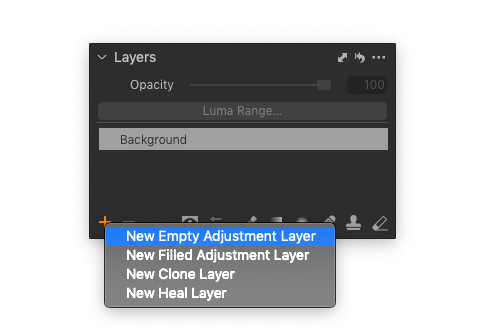
3. Select a brush in the Cursor tools or in the Layer tool panel. You can also use the shortcut B to draw a mask.
4. Draw the mask on the pupil area (that has the red-eye effect).
5. Go to the Color tool tab and navigate to the Advanced section of the Color Editor tool. Use a color picker and select the pupil.
6. Reduce the value of the Saturation slider for a chosen color range.
7. Repeat the same procedure for another eye if necessary.
Comments
5 comments
This really, really could use some "fleshing out." This is probably the most common and needed thing most users will do, and there's just not enough detail in this article.
I agree with Ian Coleman. Somewhat more information or a dedicated piece of software would be welcome. (I am not a professional photographer).
I figured out that you should magnify the eye to 800%, use the brush (not the magic brush) with dimension 2 and the other parameters at 100. Saturation to -100. This will make it possible to change the color pixel by pixel. And that way you may keep the light reflection spot in the eye.
Um, this needs to be an easy fix instead of creating a new layer and finding color, etc. In Bridge, i click the redeye correction tool, draw a little box around the eye and click, and the red becomes black. I have an image that has 19 people in it. Unfortunately I could not correct for it in camera so now I need to make layers? Please make this task easier.
I have just used the above with a bunch of portraits from a party at it works very well. Only modification used is to lower the lightness too.
After the first set up, i saved it as a Custom Style Brush, so after the first time it's just to initiate the red eye brush where everything is pre determined and no settings needed...maybe the brush size.
Suggest that Lily extend her description with the creation of a Custom Style Brush for red eyes.
This was an easy fix in Lightroom which I no longer use due to the subscription model and I also have ON1 RAW 2022 which does it automatically by clicking one button (the eye selection may need to be moved). This is what I used rather than faffing around with the instructions above. Come on Cap 1, get a button that sorts it!
Please sign in to leave a comment.