The Highlight slider in the High Dynamic Range tool is used to restore detail from highlights by compressing the color and luminance values at the right-hand side of the histogram.
The Shadow slider lightens the deepest shadows, compressing tonal values at the other end of the range and revealing any detail that was recorded at the time of capture.
The Black and White sliders are used for better control of the darkest shadows and the brightest highlights making it possible to fine-tune contrast using the High Dynamic Range tool only.
The HDR tool produces natural-looking images at low-to-medium values. Note that excessive adjustment can lower both contrast and saturation. It is recommended, therefore, that the Clarity tool is used to add mid-tone contrast.
The tool is placed before the Levels and Curve tools for a reason. At the risk of revealing noise, the HDR tool should not be used after the adjustment of those tools in your workflow.
- Select the image or images to be adjusted in the Browser.
- Enable Show Exposure Warnings in the toolbar, main menu, or by using the shortcut Cmd/Ctrl-E.
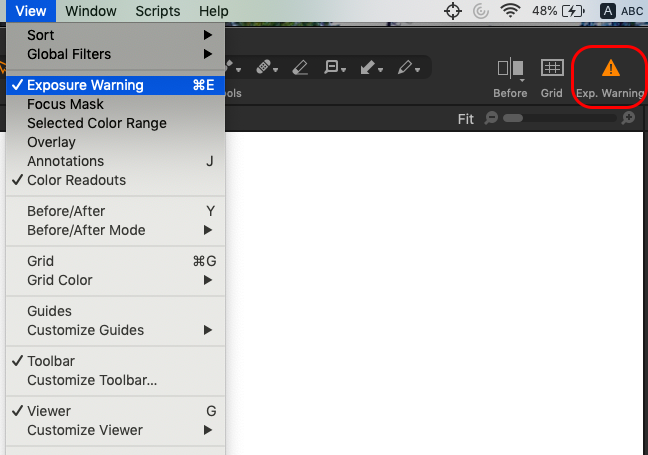
- Go to the Exposure tool tab.
- From the High Dynamic Range tool, adjust the Highlight slider to darken and recover bright and overexposed areas while observing the highlight warning mask. Specular highlights, reflections, and direct light sources can be left to clip.
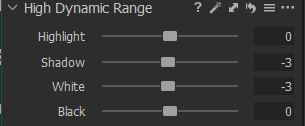
- Adjust the Shadow slider to lighten dark areas to reveal detail as necessary. Keep to low values to maintain natural-looking images.
- Adjust the White and Black sliders to fine-tune the contrast of the brightest highlights and the darkest shadows.

Comments
0 comments
Please sign in to leave a comment.