When preparing an image variant for printing, you will inevitably have to apply additional sharpening over what would normally look sharp on-screen (i.e., after input and creative sharpening). When making adjustments, it is essential to specify the image variant’s dimensions and resolution under the Basic tab and to soft proof using the proof recipe option.
- Select the image variant or variants in the browser.
- Highlight the recipe to edit the list in the Process Recipes dialog (or create a new recipe) located under the Output tool tab.
- In the Basic tab, set the image size using the Resolution/Scale options as desired.
- Enable Recipe Proofing, and set the viewer magnification to 100% initially.
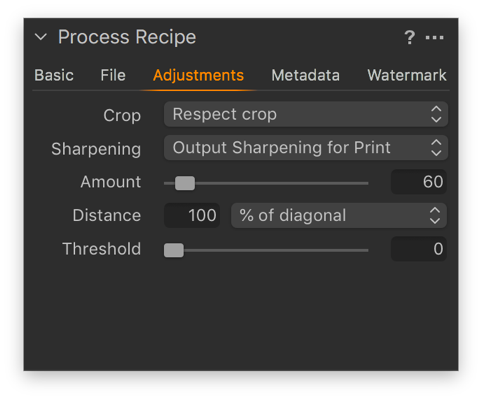
- Go to the Adjustments tab in the Process Recipe tool.
- From the Sharpening fly-out menu, select Output Sharpening for Print. The tab’s tools will change and include sliders for Amount, Radius, and options for Distance.
- Specify the viewing distance, if known, and click on the Distance fly-out menu to select units (inches or centimeters). Otherwise, select % of Diagonal and, as a general rule, select 100% or 150%.
- Set threshold first and increase if noise is visible. Then adjust the amount using the slider or the up/down arrow keys, while looking at the effects on-screen (while soft-proofing) at 100% and then at 50%. When halo artifacts or aliasing become visible or distracting, lower the amount and/or threshold in small steps until they are acceptable.
- The settings are automatically saved so they can be used again. However, it is recommended that the settings are saved as a component of a new recipe so that they are less likely to be accidentally overwritten.
<< Overview of output sharpening | Applying screen sharpening >>
Comments
1 comment
Output sharpening for print: Are the amount sliders and the % of diagonal interactive? Does the % of diagonal override the amount slider or, if I put in an amount, should I set the % to "0"? Or should I be using both of these? It's not clear. Thank you.
Please sign in to leave a comment.