
Control user access, invitations, and device activations for your Studio for Enterprise plan from the User access tab. This section provides a clear overview of users, devices, and licence usage, along with tools to manage access efficiently.
Contents
Users access tab
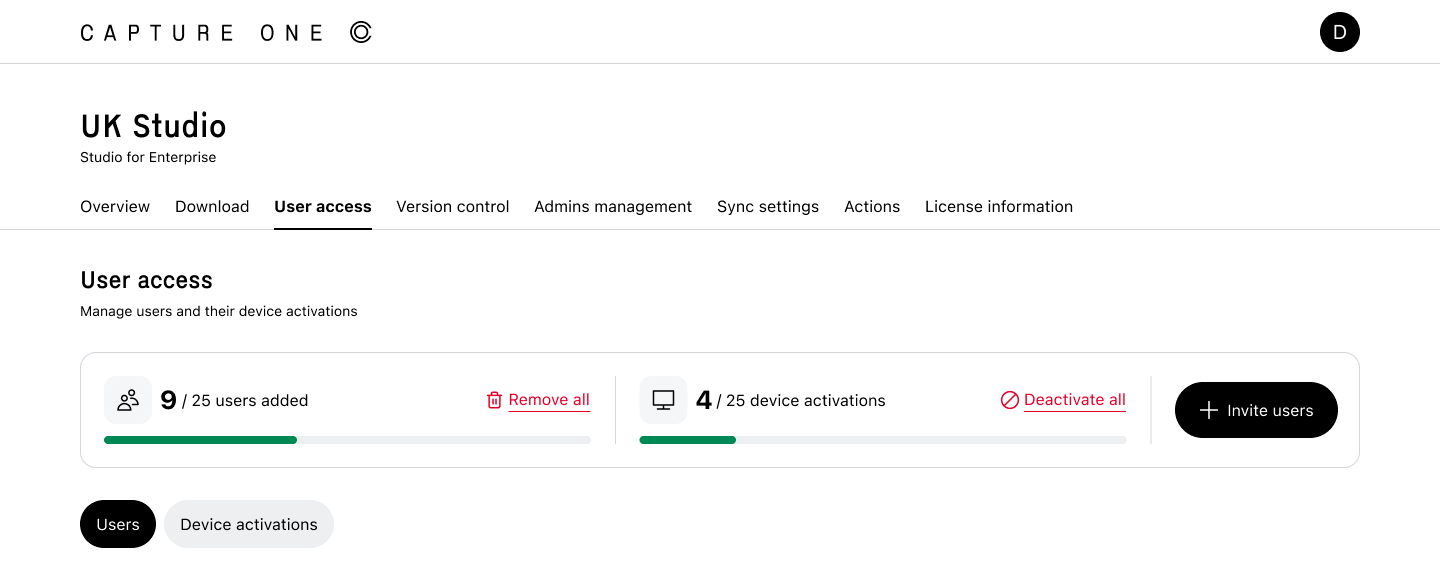
The Users access section shows:
- Total number of users added
- Total number of devices activated
You can also deactivate users/devices in bulk.
The Invite users button enables you to add multiple email addresses at once to invite photographers or employees while optionally setting an expiration date for their access. Simply enter the email addresses, separated by commas, choose an Expiration Date if required, or leave it disabled to allow ongoing access, and then click Save to apply your changes and send the invitations.
Users
The Users pane displays all users along with key details organised into the following columns:
- User email: The user’s email address.
- Access source: Indicates how the user obtained access, either through an admin invitation or by activating a license key.
- Devices: Shows the number of devices the user has activated.
- Expires: Displays the expiration date set by the admin for the user’s access.
- Actions: Allows you to update the expiration date or remove the user, which revokes their license. If a user is removed accidentally or needs to be reactivated, you can invite them again.
You can quickly search and filter users to find specific accounts or devices. Each user entry can be expanded to display:
- Activated devices
- Operating system
- Capture One version
- Last used date
Enter a user’s email address or a device name into the search bar to quickly locate specific records. To further refine your results, use available filters such as Access source, Version, and Operating System (OS).
User Groups
Administrators can use groups in the User access tab to organize users, allocate license capacity, and manage access more efficiently. You can create groups, invite users directly to a group, move users between groups, update group settings, and delete groups that are no longer needed.
Create a group
Create a user group to give a team its own user limit. The same limit applies to device activations, shared across all users.
- Open the license you want to manage and select User access.
- In the User access tab, click Create group.
- Enter a group name and specify the User limit for the group.
- Click Save.
- Verify that the new group appears in the User access tab.
Note: The user limit assigned to a group is allocated from the total number of users available on the license.
Invite users to a group
Invite new users directly to a specific group.
- In the User access tab, select the group you want to add users to, then click + Invite users.
- In the Invite users dialog, enter one or more email addresses, optionally configure an Expiration date, and then click Add users.
Note: Users do not need to belong to a group and can also be invited directly to the license without being assigned to a group.
Move users to another group
Move users from their current group to another existing group.
Move a single user
- In the User access tab, select the group that contains the user you want to move. Click the three-dot menu in the user's Actions column, then select Move user.
- In the Move user dialog, open the Destination list and select the group you want to move the user to.
- Click Save.
- The user is moved and no longer appears in the current group.
Move multiple users
- In the User access tab, select the group that contains the users you want to move. Select the users, then click Move.
- In the Move users dialog, open the Destination list and select the group you want to move the users to.
- Click Save.
- The users are moved and no longer appear in the current group.
Tip: If the destination group does not exist, select New group from the Destination list.
- In the Destination list, select New group.
- Enter a Group name and User limit, then click Save.
- The new group is created and the selected user or users are moved to it automatically.
Edit a user group
Update a group's name or user limit to reflect changes in your organization.
- In the User access tab, select the group you want to edit. Then click the three-dot menu next to Invite users and select Edit group.
- In the Edit group dialog, update the Group name, User limit, or both as needed.
- Click Save to apply your changes.
Delete a user group
Delete a user group when it is no longer needed. Users from deleted groups will be moved to ''All''.
- In the User access tab, select the group you want to delete. Click the three-dot menu next to Invite users, then select Delete group.
- In the Delete group dialog, click Delete to confirm.
- Verify that the group is no longer displayed in the Group section and that the Group deleted. confirmation message appears.
Bulk actions
You can select multiple users using the checkboxes and perform actions like Edit Expiration or Remove on several users at once.
Device activations
The Device activations section provides an overview of all devices that have activated a license, along with key usage and management details.
Activation details
For each device, you can view:
- Device name: the name of the activated device
- User email: the email address associated with the activation
- Operating system (OS): the OS running on the device
- Capture One version: the version of Capture One installed
- Last used date: the most recent activity on the device
- Deactivate option: the ability to deactivate the device and free up an activation
Search and bulk actions
Use the search bar to locate devices by name or users by email. You can narrow the results further by applying filters such as Operating System (OS) or Capture One version.
To deactivate several devices at once, select them using the checkboxes and proceed with a bulk deactivation.
Activation history
Selecting View all activation history allows accessing the complete activation log. This is useful for reviewing detailed activation history and tracking usage.
Deactivate a device in Capture One
This option is intended for individual users who have been invited to a Studio for Enterprise license. If you are a Studio for Enterprise administrator, you can manage users and device activations from the User access page instead.
If you receive an Activation limit reached message, you can deactivate a device directly in Capture One.
-
Start Capture One.
-
Select your Studio for Enterprise license.
-
Under the list of activated devices, find the device you want to remove and click Deactivate. The device name identifies the computer where Capture One is activated. This is typically the computer name assigned by your operating system.
-
After deactivating an unused device, click Continue to activate your license on the current device.
Comments
0 comments
Please sign in to leave a comment.